So, you’ve decided to put a new wood gym floor in your facility. Now what? A lot of people don’t know the process that takes place in order to make that new gym floor into a reality.
A common misconception about installing a new wood gym floor is how long it takes. Most people think it can be done in a week or so, but they would be wrong. It is a 6 week process. Sounds long, doesn’t it? Don’t worry, once we explain all the steps involved, you’ll understand why we need 6 weeks to do it right.
Step 1: Subfloor
Once all the paperwork is in place and we have scheduled an install date, the first thing we will do is send a pre-start checklist for the client to fill out. This checklist will tell you what temperature the room needs to be, humidity levels, concrete requirements, etc. Once you have signed off on those requirements, we will have the subfloor and maple delivered. At that point, our crew will immediately install the subfloor. Depending on the size of your gym, this process could take 3-5 days.
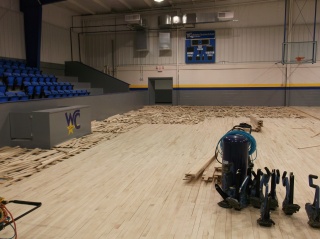
Step 2: Racking Out
Once the subfloor is installed, our crew will rack out the maple. What does that mean? Our guys will lay out the maple in a puzzle-like pattern across the subfloor. This allows the maple to evenly absorb any moisture in the air and it will acclimate as it does. Acclimating means that the maple will adapt to its environment by absorbing a certain amount of moisture. Each area of the country has a certain acclimation level that the maple must meet before we can begin nailing. This will ensure that we can install the maple properly, leaving enough room for fluctuations in humidity. You see, as the humidity outside fluctuates, wood expands and contracts. If it is a dry day, the maple will shrink up. If it is a humid day, the maple will expand and grow bigger. If it is nailed before it can absorb the proper amount of moisture, then about 6 months down the road the maple will expand so much that your floor will begin to buckle.
Step 3: Wait
Once the maple is racked out, our crew leaves the jobsite so that it has time to acclimate to the environment. Depending on the time of year and the requirements for your area, this usually takes 5-10 days. No one will be working on the floor during that time, but have no fear. We will monitor the moisture levels of the maple and we will return as soon as the floor is ready.
Step 4: Nailing
Once we have confirmed that the maple is properly acclimated, our crew will return to nail the maple. This is quite a sight to see. Our guys have (very heavy) nail guns and they work one board at a time, hitting the nail gun with a sledgehammer to insert the nail every 12″ on center. It is back-breaking work, especially because our crew has to stay bent over, hitting and moving the nail guns the entire time. So do not be alarmed if you see them take frequent breaks to rest their backs (they will even lay down on the floor sometimes so that they are not bent over for a while). Depending on the size of your floor, nailing a gym floor usually takes 5-6 days.
As they nail, our crew will leave gaps in the floor called expansion rows. These are required so that the floor still has room to expand as the weather changes, if need be. Over time, they will close up, but you’ll notice that they are there for a while.
Step 5: Sanding & Sealing
So the subfloor and maple are installed. What now? Now, we get on our giant ride-on sander and sand that wood! This is a messy, dusty process. We will sand the floor 3 times – once with coarse sand paper, once with medium sand paper, and once with fine sandpaper – until it is smooth and even. This process takes 4-5 days.
Next, we tack the floor until it is clean and prepare it for the seal coats. We will apply 2 coats of seal to the floor, allowing 24 hours of dry time between coats, and after the last coat of seal.
Step 6: Painting
After the last coat of seal dries, it’s time for most of our clients’ favorite steps: painting the floor! Our artist will arrive and will begin the process of making your floor distinctly YOURS. The painting process can take anywhere from 2 days to 5 days, depending on how much paint is going on your floor, and how detailed the painting is (i.e. if logos are multiple colors or have fades). The paint must dry for 48 hours when complete.
Step 7: Finish
The final step is to apply two coats of finish to the floor. First, we screen the floor. Then, we tack it clean, and apply a coat of finish. Then we repeat the process. Finish is what makes the floor shiny and a little sticky. It is the reason tennis shoes squeak on a gym floor. If your floor ever gets slippery, that usually means it’s time to apply another coat of finish to it – which should happen once a year.
Always make sure that whatever company is applying finish to your floor is using an MFMA-approved finish. If they aren’t, insist that they do or switch companies. There are hundreds of finishes to choose from, but not all of them are made for gym floors. For the safety of your players, ALWAYS use a finish that has been approved by the MFMA.
Once the last coat of finish is on your floor, the gym must remain empty until the finish is dry. This happens in two phases: after 72 hours, foot traffic is allowed on the floor. However, you must wait 7-10 days before any rolling loads can go on the floor (i.e. bleachers, chairs, podiums, etc.).